An Intro to Google Tag Manager
by Anvil on July 10, 2015analyticsGoogle Tag Manager is a free tool that consolidates your website tags with a single snippet of code and lets you manage everything from a single web interface. You can add and update your own tags with just a few clicks whenever you want, and without bugging the IT folks or rewriting site code. It gives marketers greater flexibility and lets webmasters focus on other important tasks.
There are three main components to Google Tag Manager: Tags, Triggers, and Variables. Aspects of each of those components will be explained below.
Tags:
Tags are tiny bits of website code that let you measure traffic and visitor behavior, understand the impact of online advertising and social channels, use remarketing and audience targeting, test and improve your site, and more.
What you used to hard code but can now implement through a tag:
- Google Analytics Tracking Code
- Event Tracking
- AdWords Conversion Pixels
- Remarketing Tags
- Custom HTML/JavaScript
In Google Tag Manager, you can deploy a tag via a template for the specific tag, or, if a template is not available for the tag you via a custom tag into which you can place your tag JavaScript. Google Tag Manager offers:
- Templates for supported Google and DoubleClick tags
- Templates for certified vendor tags
- Custom tag types for all other tags

One of the templates through Google Tag Manager is for Google Analytics.
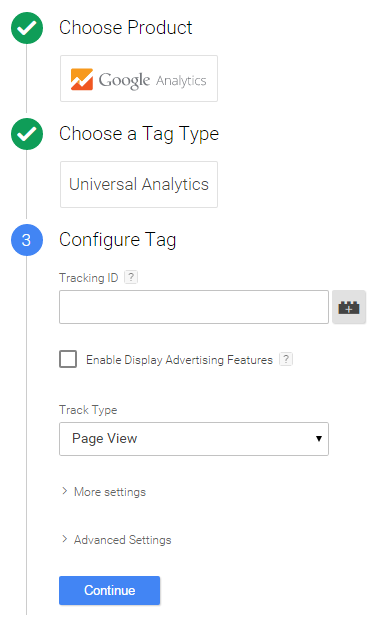
To create a tag for Google Analytics page view tracking you do the following:
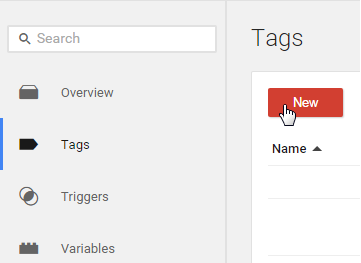
- Create a new tag
- Name your tag
- Select the Google Analytics tag template
- Select whether you’re using Universal Analytics or Classic Google Analytics
- Once you’ve selected that you will configure your tag. To do so you’ll need your tracking ID, which looks like this UA-xxxxxx-xx. You can find that within your analytics profile.
- The “Enable Advertising Features checkbox” is option but it will enable display advertising features, including demographics and interest reports, remarketing, and more.
- Hit continue and select which trigger should apply to this page (for this page view tag for Analytics you’ll want it to fire on All Pages).
- Once you have created you’re tag you need to complete one of the most important steps, publishing your container. If you don’t publish your container any new tags you’ve added will not fire, or show in your container if you’re in debugging mode.


Triggers, formerly known as rules:
In web containers, triggers attached to a tag govern when the tag is fired or not fired. In web containers, a tag must have at least one trigger in order to fire. Triggers are evaluated during runtime and associated tags are fired (or not fired) when the trigger conditions are met.
A Rule triggers a tag(s) to fire:
A tag will fire whenever any one of its triggers are met. For example, if a tag has two triggers, one for “all pages” and another for “only page XYZ”, the tag will fire on all pages.
A trigger that blocks a tag from firing always overrides a trigger. For example, if a tag has a trigger “all pages” and a blocking trigger “URL equals thankyou.html”, the tag will never fire on the page “thankyou.html”.
All tag firing in Google Tag Manager is event-driven. Anytime an event is registered by Google Tag Manager, triggers from the container are evaluated and tags are fired accordingly. No tag can be fired unless an event occurs.
An event can be a pageview, a click on a button, a form submission, or any custom event that you define. Google Tag Manager has 6 built-in event types plus a custom event option. The first step in setting up a trigger is selecting the event type associated with it. The built-in events include:
Variables, formerly known as Macros:
Variables are used in triggers and in tags. In triggers, they are used to define filters that specify when a particular should be executed (e.g.: to execute a pageview trigger when the URL variable is “example.com/index.html”). In tags, variables are used to capture dynamic values (e.g.: passing the transaction value and products purchased to a conversion tracking tag).
Variable types for the web are:
- 1st party cookie (The value is set to the 1st party cookie with the matching name for domain that the user is currently on)
- Built-In Variables (commonly-used, pre-created, non-customizable)
- Constant String (The value is set to the string you provide)
- Container Version Number (When the container is in preview mode, the container version variable returns the container’s preview version number. Otherwise, this variable returns the container’s live version number.)
- Custom JavaScript (The value is set to the result of a JavaScript function)
- Data Layer Variable (The value is set to ‘value’ when the following code on your website is executed: dataLayer.push({‘Data Layer Name’: ‘value’}) )
- Debug Mode (The value is set to true if the container is being viewed in debug mode)
- DOM Element (The value is set to the text of the DOM (Document Object Model) element or the value of the specified DOM element attribute)
- HTTP Referrer (The value is set to the HTTP referrer, the previous page that the person visited)
- JavaScript Variable (The value is set to that of the global variable you specify)
- Lookup Table (The value is set according to the instructions in a lookup table)
- Random Number (The value is set to a random number between 0 and 2147483647)
- URL (This type of variable allows you to parse and expose URL components)
Variables you can use in tags and rules:
- {{tracking IDs}}
- {{event values}}
- {{lookup tables}}
- {{dataLayer variables}}
- {{custom JavaScript}}
Hopefully this overview has shown you the value of using a tool like Google Tag Manager, how you can take a strain off of your IT team, and how tag management isn’t scary and can be fun!
Need more help or are looking for more information?
You can contact the Anvil team here.
