
While the last entry in this series focused on Google Analytics to track onsite behavior, this article will talk about setting up goals and using Google Tag Manager to further your understanding of specific actions users are taking down to the click. Tag Manager is installed, similarly to Google Analytics, by inserting a generated code-snippets into the heading and body of a site’s HTML. Once this is done, tags can be created in the platform which are then linked to Google Analytics goals.
The last article mentioned Analytics goals briefly but did not get too far into the details. Goals are custom metrics that can be created to trigger when certain conditions are met by a user.
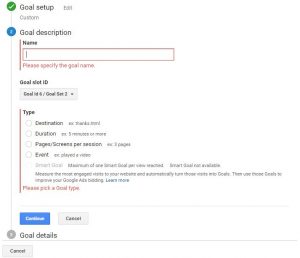

The types of goals available in Google Analytics are limited but can be very useful in certain situations. The Destination goal triggers when users land on a page with a specific URL or URL path included. This goal type can be leveraged as a simple way to track form fills. While there are more complex, and accurate, ways of tracking forms with Tag Manager, the destination URL can be set to that of a “Thank You” page if one exists for that form. When a user finishes a from and is directed to a Thank You page, the destination goal will trigger and be recorded in Google Analytics. Analytics has several other goal types including goals that trigger when a user has visited a set number of pages or spent a certain amount of time on the site.
The goals in Google Analytics are simple to understand and set up, but they can quickly be outgrown by advertisers looking to track more complex actions. For these situations, there is Tag Manager, a Google product which allows custom “tags” to be created and applied to certain events on a website and then fed into Google Analytics as trackable goals.
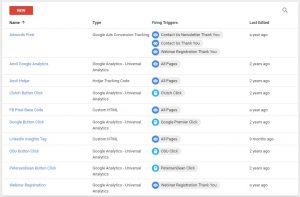

The concept of tagging is simple, but the tags themselves are made up of several components. Once you have a handle on the core concepts of tags they are easy to build and endlessly customizable. When setting up a tag, an advertiser must choose triggers that cause a tag to fire. This can be as simple as a mouse click, but can include many different conditions such as page URL, time on site (much like Google Analytics), but can also require conditions such as the text of a button or backend metadata properties.

In the example above, you can see two main factors that make up an individual trigger: the event type and filter. The event type is the general type of action the trigger is looking for. The page view is a simple concept, in which the trigger condition is met when a certain page URL is loaded. The next column over, the filter, shows what conditions the page URL must meet for the trigger to fire. The “All Elements” event type is a broad type of event which can be triggered by many different variables. In the example above the variable being referenced is the Click ID.
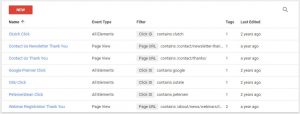
Variables are a technical term used to note the “value a trigger needs to evaluate in order to know whether or not it should fire” (Moz). In the Triggers used by Anvil, the variables being evaluated are the Click ID and Page URL; the grey boxes in the Filter column. However, variables can be almost anything. Tag Manager comes with a large set of pre-made variables and it is also possible for users to create custom variables to fit specific needs.


The above picture shows just a few examples of Tag Manager’s Built-In Variables. Variables are the first step to connecting onsite objects and actions to the goals being tracked in a marketing campaign.
Taking the time to understand how all these factors cooperate to create a single goal can take some getting used to, but the overall concept is easy to grasp. Variables are onsite values that make up the trigger conditions for a Trigger. One or more triggers are added to a Tag, and once all triggers on an individual Tag are fired, the Tag itself fires. The Tags are connected to Google Analytics as a custom goal and a new goal is recorded every time the proper Tag fires.
There is no better way to truly understand Tag Manager without getting in the platform and trying it out yourself. Start with something easy, like creating a click listener, and then work your way up to larger, more complex tags. Keep in mind that the ultimate goal is to measure actions that relate to your individual business goals. The reason we measure user behavior is to find what kind of behavior is leading to the most profitable conversions and where there are pain points that can be addressed and smoothed out.
If you missed part one in this series, learn how to use Google Analytics to gain actionable insights about your business, or, if you have an app, get familiar with Firebase and how you can use it to measure and increase app engagement in the final entry of our measurement and instrumentation series.