
Are you looking for a quick and simple way to add code to your website without having to rely on a web developer? Look no further – Google Tag Manager is the answer. Google Tag Manager is a free platform that utilizes a tagging system for easy code implementation and removal. With this tool, your team will no longer have to manually insert or modify code.
There are 3 main components to Google Tag Manager: Tags, Triggers, and Variables.
Tags: Code snippets provided by external sources that integrate platforms, tools, and other support with your website. Google Tag Manager already has preset configurations for all types of platforms like Google Analytics, Google AdWords, and more.
Triggers: A specific action that needs to occur in order for the tags to “fire” or collect the desired data and send it to the desired location. Examples of common triggers include button clicks, page views, or form fills.
Variables: Provides specific information about what the tag is supposed to do. Google Tag Manager has two types of variables: built-in variables and user-defined variables. Built-in variables have already been configured by Google Tag Manager. Common variables within this category include Page URL, Click Text, and Form Classes. User-defined variables are variables manually set up by the user. A user-defined Google Analytics Settings variable sends data to a specific Google Analytics account.
Note: Prior to any tag configuration, be sure to configure any known variables first. From the side menu, click “Variables.” Within the built-in variables section, click “Configure.” Look for any variables you might use and check their boxes. Check any variables listed underneath “Clicks,” Forms,” and “Videos.”
Google Tag Manager offers endless possibilities for tracking data and site activity. However, there are 3 main types of tags every marketer should know:
1) Button Clicks
Understand which buttons get the most clicks, which is useful for A/B testing and site design. This setup will give you the guidance to track all types of button clicks on your site.
Tag Configuration:
1) Click on “Google Analytics: Universal Analytics.”
2) Change the Track Type to “Event.”
3) Name the Event Category “Button Clicks.”
3) If this button appears across multiple pages, set the Event Action to “Page Path.”
Do so by clicking on + sign, then clicking “Page Path.”
4) Change the Google Analytics Settings to your desired Google Analytics account.
Trigger Configuration:
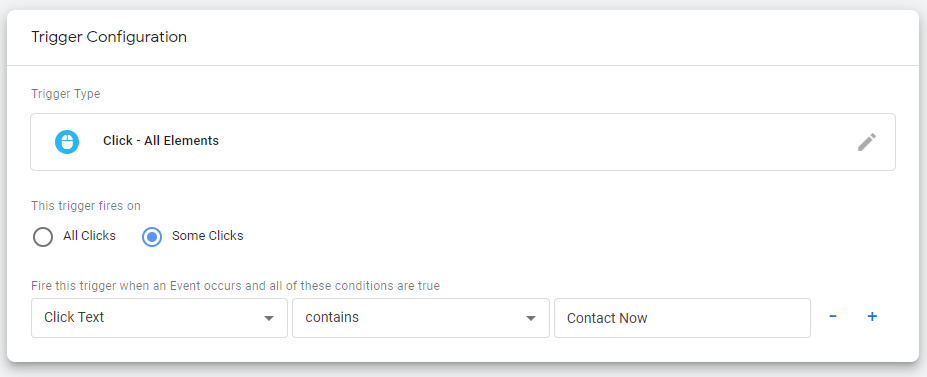
1) This new trigger will be for clicks. Select “All Elements” under the list of trigger types.
2) This trigger fires on “Some Clicks.”
3) This is where you will specify which button clicks to track. Typically, the easiest way to distinguish buttons is by their text. For the first box, click and find “Click Text.” In the third box, insert the button’s text. Note: Capitalization and punctuation matter. In order for the trigger to fire properly, it has to match the button text exactly.
Let’s say you have a “Contact Now” button. To track clicks of these buttons, our trigger configuration will look like this:

2) Video Views
Another useful tag configuration to know is for YouTube video views. You can track views of specific videos, or all videos on your site. Below are instructions for tracking views of a single YouTube video.
Tag Configuration
1) Click on “Google Analytics: Universal Analytics.”
2) Change the Track Type to “Event.”
3) Name the Event Category “Video Views.”
4) Set the Event Action to “Video Title.” Click the grey icon, scroll to “Video Title” and click.
Trigger Configuration
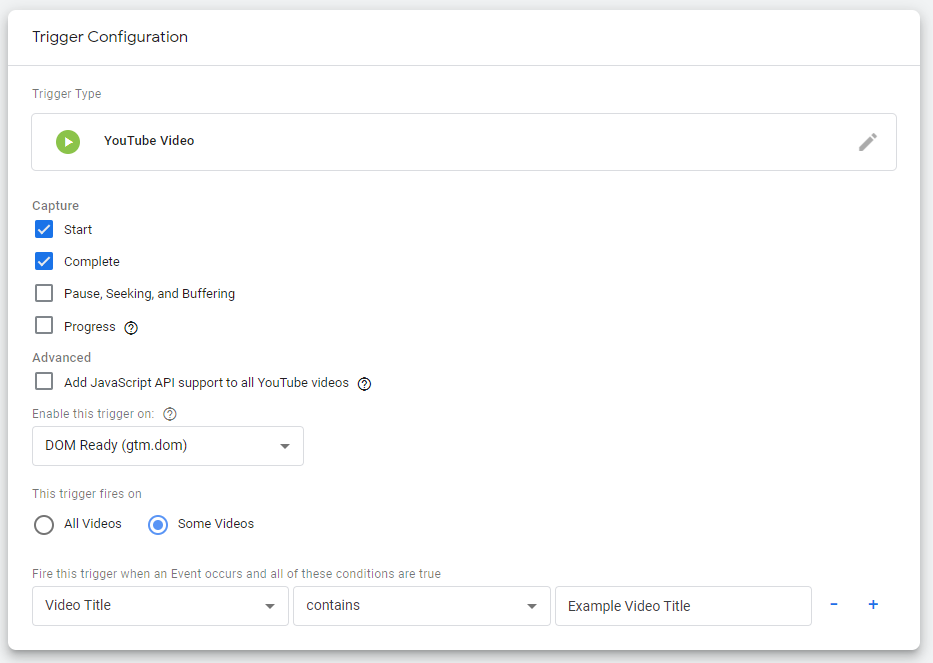
1) Under User Engagement, click on “YouTube Video.”
2) The boxes within the “Capture” section represent the activity you would like to track. By default, “Start” and “Complete” are already checked. Feel free to check additional boxes, or if you are only interested in the number of times a user completes the video, you can uncheck “Start.”
3) The trigger will fire on “Some Videos.”
4) The first box will need to have “Video Title”. Click on the box, find “Video Title” and click.
5) The third box will need the desired video’s title.
Let’s say you have a video named “Example Video Title.” To track engagement with this video, configuration will look like this:

3) Facebook Pixels
Active Facebook campaigns utilize pixels to understand what happens when a user navigates to a website after engaging with a Facebook ad. The pixel itself is a snippet of code that needs to be placed on your site. Follow the steps below to implement Facebook pixels.
Tag Configuration
1) The tag type will be “Custom HTML.”
2) Copy/Paste your Facebook pixel code into the text box.
Trigger Configuration
1) The trigger type will be “Page View.”
2) The trigger will fire on “Some Page Views.”
3) The first box will need to have “Page Path”. Click on the box, find “Page Path” and click.
4) The third box will need the page on which the Facebook pixel will live.
Configuration will look like this:
![]()

After any tag configuration, the most important thing to do is test. This will make sure the tag fires properly before you publish the changes. More often than not, your tags may need some fine-tuning for optimal data collection. Click on “Preview” in the upper right corner to perform testing.
As we already mentioned, Google Tag Manager is a critical tool for marketers to manage website activity and control data collection. For beginners, Google Tag Manager can seem intimidating, but the Anvil team is here to help. If you need help with Google Manager setup, if you are interested in learning more about this platform, or if you would like Anvil to organize your account, please feel free to contact us today.