
This blog post will provide you with a quick fix to automatically enable Google Authorship for all of your past and future blog posts or articles on your Shopify website.
In order to add Google Authorship, we’ll be making updates to the user’s Google+ profile, the user’s Shopify account, and a theme template Liquid file.
Step 1: Add your Shopify website to your “Contributor to” list
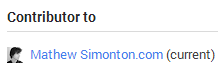

Log into your Google+ profile, navigate to your About section, and click “Edit” in your Links box featuring the “Contributor to” category. This not only tells Google what you contribute to, but also lets users viewing your Google+ profile know where they can find your work.
While you’re on your Google+ profile, grab your URL (ex. https://plus.google.com/113502513017309229039). You’ll need this for Step 2.
Step 2: Add your Google+ URL as your homepage in your Shopify account
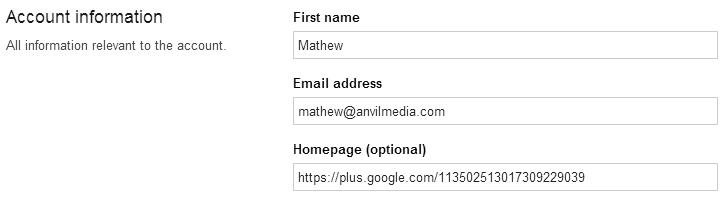

Log into Shopify and navigate to your account. (Every user has access to their own, but the administrator and users granted higher access also can make changes to other accounts.) To find your account, first click on “Settings” in the main menu on the left when you are logged in, then “Account” and then click into your name. Find the “Homepage (optional)” box and copy your Google+ URL into it.
Step 3: Update the article.liquid template theme file


To find the article.liquid file, you’ll need to navigate to “Themes” in the Shopify menu and then click on “Template Editor” beneath your current theme. You’ll be provided a list of all of the theme’s files in a new screen. Click on article.liquid.
Liquid is a templating engine developed by Shopify and a simple language used along with HTML & CSS. The file, article.liquid, is the template for an “article” or blog post.
In article.liquid, locate where your author name is pulled in. It will be the variable “article.author” and should be located somewhere between the variables “article.title” (which pulls in the blog post’s title) and “article.content” (which pulls in the article’s content.) For documentation on the Liquid article variables, click here.
When you’ve located article.author, you’ll need to add a link with rel=”author” (required to signify Google+ authorship) and ideally target=”_blank” as well (this opens the link in a new tab if the reader were to click it). To structure this link, we’ll be using the variable “article.user.homepage” which pulls whatever URL is placed in the Homepage box in the account settings (seen in Step 2).
The screenshot below Step 3 provides an example of how to place article.user.homepage in making the link.